Monday, June 9, 2014

Artsy Monday - Drying Rose Petals

Greetings everyone, amazingly I am finally posting an Artsy Monday post!! I really do have several in the works and I will share them as I finish them. For my first Artsy Monday post in WAY too long I thought I would share with you how I dry my rose petals.

My Roses

When dried, these petals are used for sachets and are especially good for love and romance spells. These roses are rich in color and have sweet, heart shaped petals.


For petals you want to cut the flowers that are open, in their prime and after the dew has dried. You do not want old, brown flowers or those that are wet. Neither will give you a good result. You can also dry rose buds. Chooses buds that are tightly formed  but showing color. When drying buds you do not remove the bud from the stem. 

As you can see above the petal on the far right has some discoloration on the top. I try to avoid using these. I like to use the best looking petals that I have. 

Pic. 1

Pic. 2

Pic. 3
Pic. 4

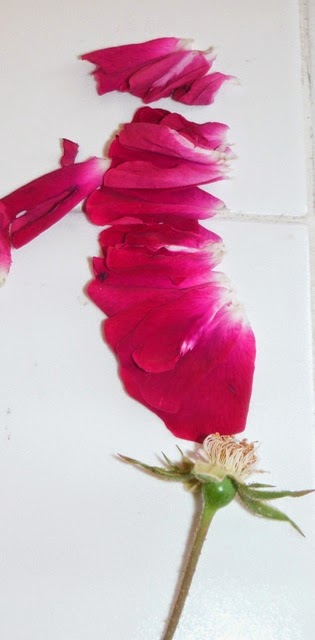
To remove the petals from the stem I grasp the flower and pull all of the petals away from the stem as shown in Picture 1 above. Next I gently twist the petals, pulling them away from their center (Pic. 2), this leaves me with the petals between my fingers (Pic. 3) and once they are laid out I can go through them looking for rot or defects (Pic. 4). Practice on a flower that is not as nice so that you have the technique down and won't bruise or damage the petals. It doesn't take much to remove the petals from the stem!

Once you remove the petals from the stem, discard the stem and go through the petals. Remove any that are discolored, moldy, brown... I do this one flower at a time, putting the petals I wish to dry on the dehydrator racks as I go.


When placing the petals on the tray you want to make sure they do not overlap, this causes uneven drying time which could lead to problems like mold if they are stored before they are fully dry!

Petals and Buds


Full Dehydrator

I like using my dehydrator to dry flowers. They dry quickly and I can lay out a lot at one time, which is important because they shrink, a LOT, during the drying process.

Same Batch! 1/2 Hour Later

After 1/2 hour the petals are already noticeably smaller.

Final Petals


Beautiful color!

I leave mine in the dehydrator for a full day, watching to make sure they do not start to brown on the edges. At the end of the day I turn the dehydrator off and leave them for the night. I live in a VERY dry climate so I do not need to worry about any humidity. When drying petals be sure to follow the directions on your particular dehydrator and for your climate.

Once this batch was completely dry I ended up with 1 cup of petals and buds from the 5 trays of petals/buds I started with. They are a rich, deep pink color and  smell wonderful! These are perfect to use in a potpourri mix or a sachet and they look wonderful in a small bowl.

You can also dry flowers and petals between paper towels, in wax paper inside of books but dehydrators are easily found in thrift shops, they help to reduce the instance of mold and are much faster. Be sure to wash the trays well before use. Make sure the trays are completely dry before adding your petals to them.

This method works great for petals and buds, for full bouquets I suggest tying the bouquet stems together and then hanging the bouquet upside down in a cool dry area and letting it dry naturally. Hanging it upside down tends to help the bouquet retain its shape.

Thanks for stopping in for a visit.


Mediterranean Olive Bread

Mediterranean Olive Bread

I know it's Monday and this isn't really an Artsy Monday type post but this bread was so great I had to post about it! 

A couple of weeks ago I found a loaf of Olive bread at my local supermarket. I love olives and it sounded interesting so I bought it for the family. It was pretty good and, me being me, I decided to find a recipe so that I could make my own. This was the start of my journey into the art of No-Knead bread making.

I scoured the internet and found several recipes for Olive bread but not till I found this recipe did I find THE recipe for Olive Bread. The link takes you to the You Tube video for the No-Knead Mediterranean Olive bread by Artisan Bread with Steve. 

I was new to the No-Knead bread making method and I can tell you that I am now hooked! Steve has several cookbooks and you can find them on Amazon, the video has the recipe for the bread I made and it was SUPER EASY! I started watching the video, writing down the recipe, then I googled Steve and when I found that his cookbook 28 Popular No-Knead Breads was only $3.99 to download for the kindle (I have the app on my computer) AND it had the Olive Bread recipe in it - I bought it!

Just an FYI- You do not need to buy the cookbook to get the recipe, Steve provides it in the video. I am not trying to promote this video or any of the cookbooks, I am not receiving any type of compensation for my post (in fact Artisan Bread with Steve has no idea who I am LOL), the bread is just so good that I had to share and I wanted to do so in a way that respected his recipe :0)

Anyway, This bread is baked in a covered stone baker. Because I was so impatient I chose to go buy a new baker from my local kitchen store for the hefty cost of $60. I have since been told to check 2nd hand stores though I will confess that it has been worth every penny!

Superstone Baker by Sassafras 

Ready to Bake

The bread itself it super easy. Basically you mix everything together and then let is sit overnight - this is where the no-knead comes in. 12 - 24 hours later you divide it, let is sit for another 2 hours then bake it for a total of 35 minutes (part with the lid, part without) and you end up with an amazing loaf of bread full of flavor! 

If you like bread, especially easy to make, delicious bread, then check out the video. You can also google "no knead" bread for alternatives to buying a baker which will give you pretty good results and make you bread adventure a bit less expensive.  

One tip, if you decide to make this bread, get the best pimento stuffed Spanish olives you can find/afford. I used inexpensive green olives that I had in the fridge with the first loaves I made and a much better Spanish Green from Costco the second time and there was a noticeable difference in the flavor, both were fantastic but the second batch had a deeper flavor. 

Finally a word of caution - this bread is so good you'll find yourself making it, a lot! I've baked 4 loaves of this and the longest it has lasted is 2 days! 

Saturday, May 31, 2014

7th Annual Mad Tea Party!


I am so excited! I just joined the 7th Annual Mad Tea Party being hosted by Vanessa at A Fanciful Twist. These are so much fun. To learn more about joining in on the fun you can click on the picture above. If you'd like to see what I did for my two previous Mad Tea Parties you can see them here and here.

Hope to see you at tea!

An Unexpected Hiker

Brown Bear

I am taking part in a trail challenge in my area. For a nominal fee I received a digital booklet of the local parks department trails as well as a challenge log. My employer will reimburse me my challenge fee if I complete at least 5 hikes on my own or 3 guided hikes and if I complete 5 hikes then I also get a trails challenge t-shirt which I must have! Since I love to be outdoors and also to hike this is going to be easy peasy!

Today was the first guided hike I went on, it was interesting, informative and lots of fun! The hike was at a much slower pace than I would do alone but I learned a lot about the history of the area and I even found a local spot for hemlock!

About half way through we say the above brown bear coming down the side of a hill near us. Fortunately our large group was not interesting to him and he followed the trail ahead of us then ran across the meadow. It was AWESOME to see this beautiful creature.

Wednesday, May 21, 2014

Peter, Peter the Brains Eater!

Peter, Peter the Brains Eater arrived here on Monday afternoon and I couldn't wait to see what was inside the package that was sitting on my front step,

Peter

Of course Peter was in there, sitting on the pumpkin he has his wife stored in.


So amazingly cool

Then there was an amazing journal complete with really cool zombie pumpkin bookmark/slider


This awesome candy jar was also tucked inside - I had to take the entire package to work to show it off, my co-workers love to hear about these swaps and see what we make. This candy jar may have to go back towork with me. It is just perfect!!!


This amazing zombie head now hangs in my studio. I love this, kind of reminds me of a shrunken head :) Now, those amazing, colorful knitted creations in the background are so cool, I just can't stand it!


My picture doesn't do these justice, not only are they soft and beautiful, the pattern consists of a zombie walking and the word Zombie.

Here is a better picture

Kerry, I LOVE everything! Thank you so much. This was such a fun swap and I love that my zombie collection is growing. My co-workers are so impressed with Peter and his pumpkin full of wife is awesome! As always, you have outdone yourself!!!!

Zombies in the Nursery Swap Update


A BIG Thank You to Val over at  Yarni Gras Swapper Spot for hosting this amazing swap.

Now that my partner has received her package I can share with you the Zombie I created for this swap.

The Old Woman Who Lived in a Shoe

My partner sent me a couple of her favorite nursery rhymes and I choose to base my creation on the rhyme There was an Old Woman who Lived in a Shoe. The original poem had to be altered in a zombie way and then sent along with the Zombie that I created.

Here is the altered poem:

There was an old woman 
who lived in a a shoe
She had so many children
She didn't know what to do
When the Apocalypse came
She ate most of their brains
and now she is down to just two

Here are some detail shots of her zombiness

Exposed brain...naturally

Scratches

Those eyes! 

That is all for now. Later tonight I'll be posting the process pictures on my Sunflower House Art sculpting blog. 

Next up... the Zombie I received, namely, Peter, Peter the Brains Eater!

Tuesday, May 13, 2014

I've Let Myself Become Overwhelmed!

 Strawberries in a Barrel

I'll be the first to admit that I try to do too much. Normally I can handle lots of things at once but the past couple of months have just been too much! I have a sculpture that I will finish by Saturday, a book that needs binding (also to be finished this weekend), several posts to write for my Artsy Monday and Witchy Green Wednesday series and then I have the garden, the house, work, and most importantly my family... well, I am sure you get the picture.

Since the beginning of this blogging journey I have been a part of the BWO movement, that's Blogging Without Obligation, and while I like the idea I am still feeling overwhelmed and just blech! I may not have an obligation to blog but I really miss it! What makes the entire thing worse is that when I get like this I lose all motivation and everything screeches to a halt!

I truly am whining for a reason. Several actually. First off, I love to blog. I enjoy my blogs, I enjoy the people I've met, the relationships I've formed and the conversations I've had all because I have this blog. Secondly, I really do enjoy sharing all of the things I love. I work best under deadline - when I have a couple of projects in the queue instead of close to a dozen, and completing projects and sharing them here is fun and helps me hone my abilities.  Lastly, I miss blogging. It's been about 2 months since I blogged regularly and that just irritates me, however, what I've decided is that I can't force it. I need to get back in the swing of things slowly rather than stress myself out over deadlines. So, today I am just going to share some things that I've been working on...

Thanks for sticking around :0)


Statement piece  - Wire Wrapped Pendant

This will be a tutorial soon - really. I used copper wire as a base and then strung beads onto thin copper wire and wrapped them around it. Super easy and the base copper can be purchased at the hardware store - cheap!


Zombie - sorry I can only share a glimpse of this until it has been delivered to its new home. All I can tell you is that I am really excited about how it is turning out!


My Run of Dye tutu  - possibly a new tutorial coming soon - this was so easy I did it in less than 2 hours and the color possibilities are limitless! I ran about 1/2 this 5K run, not bad since I don't run. If you want to have fun, get in a good walk(or run if you like to run) and support a local charity then check out Run or Dye. They put on a fun event and the proceeds benefit a local charity. My friends and I had a great time!


My garden - This was quite the event. I planted my entire garden on Saturday, the day before Mother's day. That evening I checked the forecast to make sure it wasn't going to freeze, went out to dinner, got home about 10:30 that night and it was still 50 outside so I thought everything would be fine -NOT. Next morning it was 27 and my entire garden was dead. Fortunately, my man took me out to the nursery to replace my plants for Mother's Day so I was able to replant and now I have a tarp system to keep it safe and warm!

Aside from everything else I've been doing, I spent the past 4 months teaching my baby boy to drive and last month he got his freedom aka driver's license. It's been an exhausting few months but as much as I am tired and behind in everything, it's still been a great ride!

I hope to be back posting regularly soon, right now I am just going to plan on posting as often as I can and I figure the rest will fall into place!

Have a lovely week!