Friday, February 28, 2014

E is for Essential Oils - A Pagan Blog Project Post

Scouring Powder made with Sweet Orange and Clovebud Essential oils.

I use essential oils a lot in my practice. I use them in ritual, for spell bottles, magical housekeeping supplies, homemade lotions, potions and so much more.

Merriam-Webster defines Essential Oil as follows: Any of a large class of volatile odoriferous oils of vegetable origin that give plants their characteristic odors and often other properties, that are obtained from various parts of the plants (as flowers, leaves, or bark) by steam distillation, expression, or extraction, that are usually mixtures of compounds (as aldehydes or esters), and that are used often in the form of essences in perfumes, flavorings, and pharmaceutical preparations—called also ethereal oil, volatile oil; compare fatty oil, fixed oil.

Essential oils are used for medical purposes, for beauty and cosmetics, for perfumes and also for their magical properties.

In my Witchy Green Cleaning series I explain how to create cleaning products for the home that have specific magical purposes by using essential oils, for instance a window cleaner that includes protective qualities based on the Bergamot essential oil in the recipe or an All Purpose cleaner that rids an area of negativity through the use of peppermint essential oil. 

Fragrance oils are not the same as essential oils though some fragrance oils are blends of essential oils. Fragrance oils are generally blends of synthetic aromas and compounds which provide the scent of a plant. They have their benefits and drawbacks but due to their synthetic origins are- in my opinion - not suitable for magical works. The reason is because when working with the magical properties of something you need the real deal not a synthetic imitation - regardless of how great it smells! 

When working with essential oils you must be sure to research the various effects they have, not only magical but physical. Many essential oils are not safe for human consumption, some are irritants when they come in contact with the skin and some are just dangerous!


When I am looking for a specific property I consult the following books:

As you can see I like to know the magical as well as the physical properties of the oils and I really love to read the scientific data on the different herbs/oils. It is always gratifying to me to see the hearth witches, medicine men/women and the folk wisdom of the past being supported by the science of today!

I am sure there are lots of other books out there but these are the ones that I have and use on a regular basis. If you have a great book on herbs or essential oils that you like please leave me a comment letting me know the title and author, I am always looking for more information on this topic.

Thanks for stopping by.


Thursday, February 27, 2014

My Sculpting Blog


I have had a blog dedicated to my sculpting for several years, however, if you check it out you'll see that until recently I have not been posting but once or twice a year (seriously - a year)! That has changed. I am now posting updates on my works in progress and my minimum goal is to post once a month.

I will be selling my work under my Sunflower House Art name and thus the blog is called Sunflower House Art - I know - totally creative :0)

Anyway, here is the link to visit my sculpting page. If you are interested in an artist's process you will see it here. I'll still be posting about my sculptures on this blog but you'll see more detail on Sunflower House Art.

Monday, February 24, 2014

Artsy Monday - Domino Pendants


Domino Pendants

Supplies
Dominos
Alcohol Inks (I used Adirondack inks by Ranger)
Tim Holtz Alcohol Ink tool or plastic gloves and cotton balls
Tim Holtz Alcohol Blending Solution
Paper Towels
Felt (for tool)
Archival Ink - Black
Gold Zig Painty pen
Krylon Triple Thick Crystal Clear Glaze
Rhinestones
Ultimate Glue
Rubber Stamps
Toothpicks
E-6000 Glue
Charms
Cord, twine or pin back


For this Artsy Monday post I am creating pendants from dominos. You can also use Mah Jong tiles or any other non-porous bits that you have hanging around.

To get started you want to make sure that the surface of your domino is clean. I normally wipe mine with a paper towel and a little bit of the alcohol blending solution. If you don’t have Alcohol blending solution you can wipe yours down with soap and water or rubbing alcohol. Let them cry completely before continuing.


When working with alcohol inks I like to have the lids of all the colors I am using removed before I begin. Alcohol inks dry quickly and I don’t want to be fumbling with a lid and have the ink dry prematurely! They also stain clothing, furniture, floors… so be sure your work space is covered and you are wearing old clothes.


To create the background I normally use 2 or 3 colors. With this demonstration I have chosen two colors (Watermelon Red and Pitch Black) plus gold metallic. Alcohol ink colors do not blend together so you can use dark colors along with bright colors and get a great contrast like I did with these.


Make sure you have a new piece of felt on your tool and then add drops of color to the felt. I add three drops of my main color and then two smaller drops of each of my accents.  

**Tip** When adding alcohol ink to the felt take the tip of the ink and place it on the felt BEFORE squeezing the ink bottle. Squeeze gently and then release. Once you have stopped squeezing the bottle you can remove the tip from the felt and go to the next color.


After you have applied the ink to the tool you will pounce the color onto the dominos. Move the tool around making sure you cover the entire surface of the domino.  You can continue to add more color until you like the result.

*** If you do not have an inking tool you can get the same effect by using a cotton ball and the ink. You will definitely want to use rubber gloves with this option!***


If you feel you have too much color you can add a couple drops of the alcohol blending solution and pounce over the domino. This will remove some of the color and provide you with some interesting patterns.

*** If you do not have the alcohol blending solution you can remove the alcohol ink from the domino with rubbing alcohol. You can experiment with the alcohol by dropping it onto the inked domino and blotting it with a cotton ball. Have fun with it. Worst case you wipe the entire domino with alcohol and start over ***


I created the backgrounds on all of these dominos without having to re-ink my ink tool. Set the dominos aside to dry.


While they are drying you will get look at the rubber stamp designs you have chosen. I like collage style stamps for this technique. You can get lots of looks from a single stamp.


Using an archival ink you will ink the stamp and place it face up on your work space. Place the domino on the part of the stamp that you like and press gently to get the image. When working with alcohol inks you do not want to use an alcohol based permanent ink for your image, it will remove the ink of the background due to the alcohol content of the ink pad. I am using Archival Ink made by Ranger. This is a fantastic product and works very well with alcohol inks.

*** If you are not comfortable taking the domino to the stamp, place the domino face up on the table and gently stamp onto the piece with the inked rubber stamp. Press straight up and down, do NOT rock the stamp or you will smear your image, pull straight up and let dry.***

Let you images dry completely. To speed up the process you can use a craft heat tool.


To finish the edges I use a zig paint pen. The one I have has gold on one end and silver on the other. They provide a beautiful shiny color for the edges.


Shake the pen to mix the paint and then slowly cover the entire surface with the paint.

Let dry completely.

Now for the fun part!


You can add jewels to the pips of the domino with Ultimate glue. I take a toothpick put a small amount of glue into the hole. Gently place the jewel into the glue and press down using a clean toothpick.

Add E-6000 to back of charm


To add charms and/or beads to the front of the domino you can use E-6000 glue. It is permanent and once dry forms a strong bond between the domino and metal or beads. For light weight crystals and jewels you can also use glitter glue to adhere them to your domino.


Once you have decorated the domino to your satisfaction let it dry completely, really. The glue has to be completely dry before adding the final glaze!


To seal the piece place it in a cardboard box on an old cooling rack and spray with the Krylon triple thick glaze. I generally apply 3 coats of glaze, letting the piece dry completely in between each coat.

Before and After Glaze


Once the glaze is dry you can string it on a cord or if your dominoes are not drilled you can add a pin back using E-6000.

I currently have a selection of 3 sizes of drilled dominoes on my Etsy shop.

Final Pendant 

Thanks for stopping by!

Friday, February 21, 2014

Artsy Monday and Witchy Green Wednesday

Artsy Monday and Witch Green Wednesday posts will be every other week for a couple of months as my life enters one of its busier times. ** Update** I'll be alternating them, one week will be Artsy Monday and the next week will be Witchy Green Wednesday!

Next week Artsy Monday will feature Domino Pendants like those that I make for my Etsy shop using alcohol inks, rubber stamps, charms and more and on Witchy Green Wednesday (**the following week) I'll be posting some healthy homemade Dog treats that you can make for your furry friends.

Thanks for stopping by


D is for the Death Card - a Pagan Blog Project Post

Waite-Rider Tarot Deck

I have been working with the Tarot since I was very young and it is something that I am quite fond of. The artwork and imagery of the cards drew me in and never let me out. Occasionally a friend will ask me about all of the decks I have in my studio and at least half of them will ask if I have ever predicted someone's death. Morbid but true - seriously where do people come up with this stuff!

The death card does not necessarily indicate that someone is going to die. This card is all about endings and transformation. As you will see in the pictures below. Some decks, including one of the decks I have, do not call the card Death, the one I have calls the card Transformation.

With that said, the Death card can, on rare occasions, indicate that someone will pass on from this life. I have never had that happen in the entire 30 plus years that I have been working with the Tarot but sometimes the thing that is ending is a life, which could be the individual, a relative, a friend or even a pet.  

When the Death card shows up in a reading there a so many different possibilities. Of course it depends on the placement and whether the card is upright or reversed (as an FYI, some people do not read reversed cards, they read all of them upright - I am not one of those people). When Death shows up is could mean the end of a task, a bad day, a relationship, a job or even the end of the situation an individual is currently in. It could indicate that the bonds holding someone back will end and they will be able to move forward to something new. It can be negative or positive and sometimes it could be both. If a job is ending it could cause hardship for the individual but it could also bring new opportunity, something that the individual would have never done if they still had that job. 

When you see the images on the many Death cards you will see that some depict actual death, including the one below which is from the Fairy Tale Tarot. This card depicts the ending of the Beast's life from the Beauty and the Beast fairy tale however it also shows the image of the couple above the death scene and as you can see Beast is a man, his transformation is revealed. This card is not called Death but Transformation and in this deck the card refers to the importance of rising above defeat and transforming yourself.

Fairy Tale Tarot

The Death card from the Steam Punk deck also depicts the end of a life. The image shows a man standing by the grave, presumably of someone he loved while Death stands in the foreground holding a scythe. 

Steam Punk Tarot

Most of the Tarot decks that I own have images of skeletons on the Death card. Here are a few of the decks I own and use.

Deviant Moon

Joie De Vivre 

The Witches Tarot

The Lord of the Rings Tarot's Death card depicts a battle and the death of Gandalf but it also talks about his rebirth on the card. This deck is interesting, I haven't used it too much yet but found the cards fun.

Lord of the  Rings Tarot

The next time you have the Death card show up in a reading - don't panic - just take the time to think about your life and the changes or transformation that could be coming. I am one of those annoying "Glass is Half-Full" people, I believe that everything happens for a reason and also that we have some say in how things play, out so when change happens, I try not to resist it too much (though I have been known to throw a fit now and then) and focus on the positive impact it could have on my life.

As always, these are my own thoughts on this topic. I am basing them on my own experiences and the work I have done with the Tarot over the past 30 plus years. Thank you for visiting!

Monday, February 17, 2014

Needful Things Swap Box Received - WOW!!!


While I was in Las Vegas my box of goodies from the Needful Things swap hosted by Val over at Yarnigras Swapper Spot arrived from Sarah Jonas of Firefly Hills Farm. I can't even begin to tell you how cool this package is so here are some pictures:

Box of goodies!

Oh my did my swap partner go all out! She sent my the most amazing package. Something that I did not mention in my Needful Things post was that Old Bay seasoning is not only my favorite seasoning it always makes me think of my Poppop. My mom's father was one of my favorite people in the world. Even though he has been gone for almost 22 years, he is still one of my favorite people :)

He taught me to fish and to clean and filet the fish I caught - which I could do very well by the time I was 8, he taught me to drive and park a boat and is one of the reasons I love the ocean so much. Growing up poor, as we did, he provided for our family by fishing, crabbing and selling fishing lures which he made in his little shop ( a converted garage). I ran wild in the reed covered sand dunes of lower Delaware and Old Bay seasoning always makes me smile. Sarah, you have no idea how cool it was to see Old Bay seasoning in the package.

The candle smells so yummy. I'll be taking that to the office so that I can smell chocolate all day. We used to visit Hershey Park every year or so when I was growing up. We loved going when the factory was running since the whole place smelled like chocolate.

Tea Forte

These little tea packets are another amazing gift. A while back my man and I went on a Caribbean Cruise with friends and during the High Tea that I attended with the girls they served Tea Forte Vanilla Orchid tea. This tea is amazing. I can't find it locally and am really excited to try these new flavors.

Seeds

Sarah also sent me a huge variety of open pollinated heirloom seeds. I am so excited about these. Many of them are from her farm. That makes them even more special. I can't wait to plant them and I will definitely plant the Chuffa in a container :)

More Goodies!!!!

More fun things, the felted wool wrapped goats milk soap us amazing. Since my skin is so sensitive, goats milk soap is one of the few that I can use on a regular basis! I can't wait to try this. The wool roving is going to have to be hair for a mermaid I think. Such a beautiful color and texture. My boys were really excited by the pancake mix and the preserves. I can't wait to try the watermelon jelly. That sounds so good. 

Sarah, you have totally spoiled me. Thank you! I will keep you posted as I plant these wonderful seeds.

Sincerely,

Autumnwind aka Debbie


And the Winner is...


Congratulations to Amanda Ferguson of Honey Pot Bears, she was the winner of the 4 oz jar of green scouring powder. Hopefully the customs inspector will not flag it :0) Thank you to everyone who visited my blog from the Grow Your Blog party. You can still visit all of the participating blogs. The blog links are located here.

Thank  you to Vicki at 2 Bags Full for hosting the party. It was a lot of fun. I've found some amazing new blogs to follow and am excited to have new followers here at Beneath the Witch's Moon.

Amanda you get to choose either Lavender Scouring power of Orange-Clovebud Scouring Powder. Email me your choice and your mailing address and I'll get you gift mailed off to you!

Thank you for stopping in for a visit.


Friday, February 14, 2014

Pagan Blog Project Post Delay

Greetings everyone,

I am currently in Las Vegas to present at a conference for my day job. Due to my hectic schedule this week my Pagan Blog Project post - D is for the Death Card will be delayed. I am really excited about this post because in my experience this is a very misunderstood Tarot card and I'd like to share my personal views on it.

Check back this weekend for my post and also, if you are part of the Grow Your Blog party be sure to leave a comment on my Grow Your Blog party post here before 1:00 PM to be entered into the drawing for a 4 oz jar of my Witchy Green Scouring Powder in your choice of Orange-Clove Bud or Lavender. I'll be announcing the winner later on today.


Wednesday, February 12, 2014

Witchy Green Cleaning – Floor Wash


Welcome back to the final installment in the Witch Green Cleaning series. This week I’m going to tell you a little bit about the floor washes that I’ve made. There aren’t too many photo’s but the recipes are great!

Before you wash your floors be sure to either sweep or vacuum any dirt. dust (or in my case) dog hair. It is much easier to mop when you've got the bits and pieces swept up!

The first cleaner is a very simple recipe that I use on my tile and linoleum. It is easy to make and leaves the floor clean. One of the best things about it is that you don’t need to rinse afterwards!! I’ve seen this basic recipe on several sites. My favorite is www.amybayliss.com, she has lots of great DIY ideas for the home.

Basic Floor Wash – Tile & Linoleum
1 Gallon hot water (very hot)
1 cup vinegar
½ cup Borax
8-10 drops Essential Oil (For the kitchen I like to use lemon essential oil because it smells so fresh!)

Mix all ingredients in your bucket and mop as usual. As I mentioned above you do not need to rinse the floor when you use this mixture!


If I just need to get the dust or dirt off the wood floors then I use this simple recipe which comes from the book The Naturally Clean Home by Karyn Siegel-Maier. This book has over 100 recipes for cleaners for every area of you home!

Wood Floor Wash
1 ½ cups water
1 ½ cups vinegar (natural disinfectant)
20 drops peppermint essential oil ( Or lemon, Eucalyptus, Pine)

Mix all ingredients in a spray bottle. Shake well. Working on a small area at a time mist the floor and then wipe using a dry mop.Repeat as necessary to remove all the dust and dirt.

Finally here is the cleaner I use to make my wood floors shine.  

To Make the Wood Shine
1 cup olive oil
1 cup white vinegar

Mix both ingredients in a spray bottle. Shake well.

Working on a small section at a time, spray floor with oil/vinegar mix and wipe dry with clean soft cloth. I use old towels that I got at my local thrift store.  

Look for towels that are old and soft and preferably white or a light color. I bleach mine when I get them home and then tear them into 2 foot by 2 foot squares. These are just right for me to use to buff the floor with my foot. I also use them to dry all of my floors when I mop them. Once I finish mopping the entire floor(tile and linoleum - wood I dry as I go) I throw one of these towels on the floor and buff it with my foot until the floor is dry, getting a new dry towel as necessary. once done I toss all the wet towels in the wash so they are ready for the next time. 

When working with wood floors always work in small sections and dry the floor as you go. You do not want to leave liquid on a wood floor for any prolonged amount of time as it could damage the floor. Always test your homemade cleaners in an inconspicuous spot before using!

Now for the witchy add-ins:

General
Rosemary – Purification, Protection and Alertness (This is also great for entrance ways)
Eucalyptus – Removes negativity, promotes healing
Lemon – Increases energy (both physical and mental) and it really smells fresh and clean!
Pine- Removes negativity and has a fresh clean, earthy scent
Sweet Orange – Peace, serenity, good luck

Bathroom/Bedroom
Lavender – Peace and Tranquility
Peppermint – Sleep, Healing
Grapefruit – To increase energy – this scent is great to get you going in the morning!

That concludes the planned Witchy Green Cleaning series for this year though if I find another cleaner that I love I’ll definitely add more!

As always use caution when mixing items at home. If you are allergic to a particular item don’t use it! IF I can answer any questions send me an email.


Autumnwind

Monday, February 10, 2014

Artsy Monday


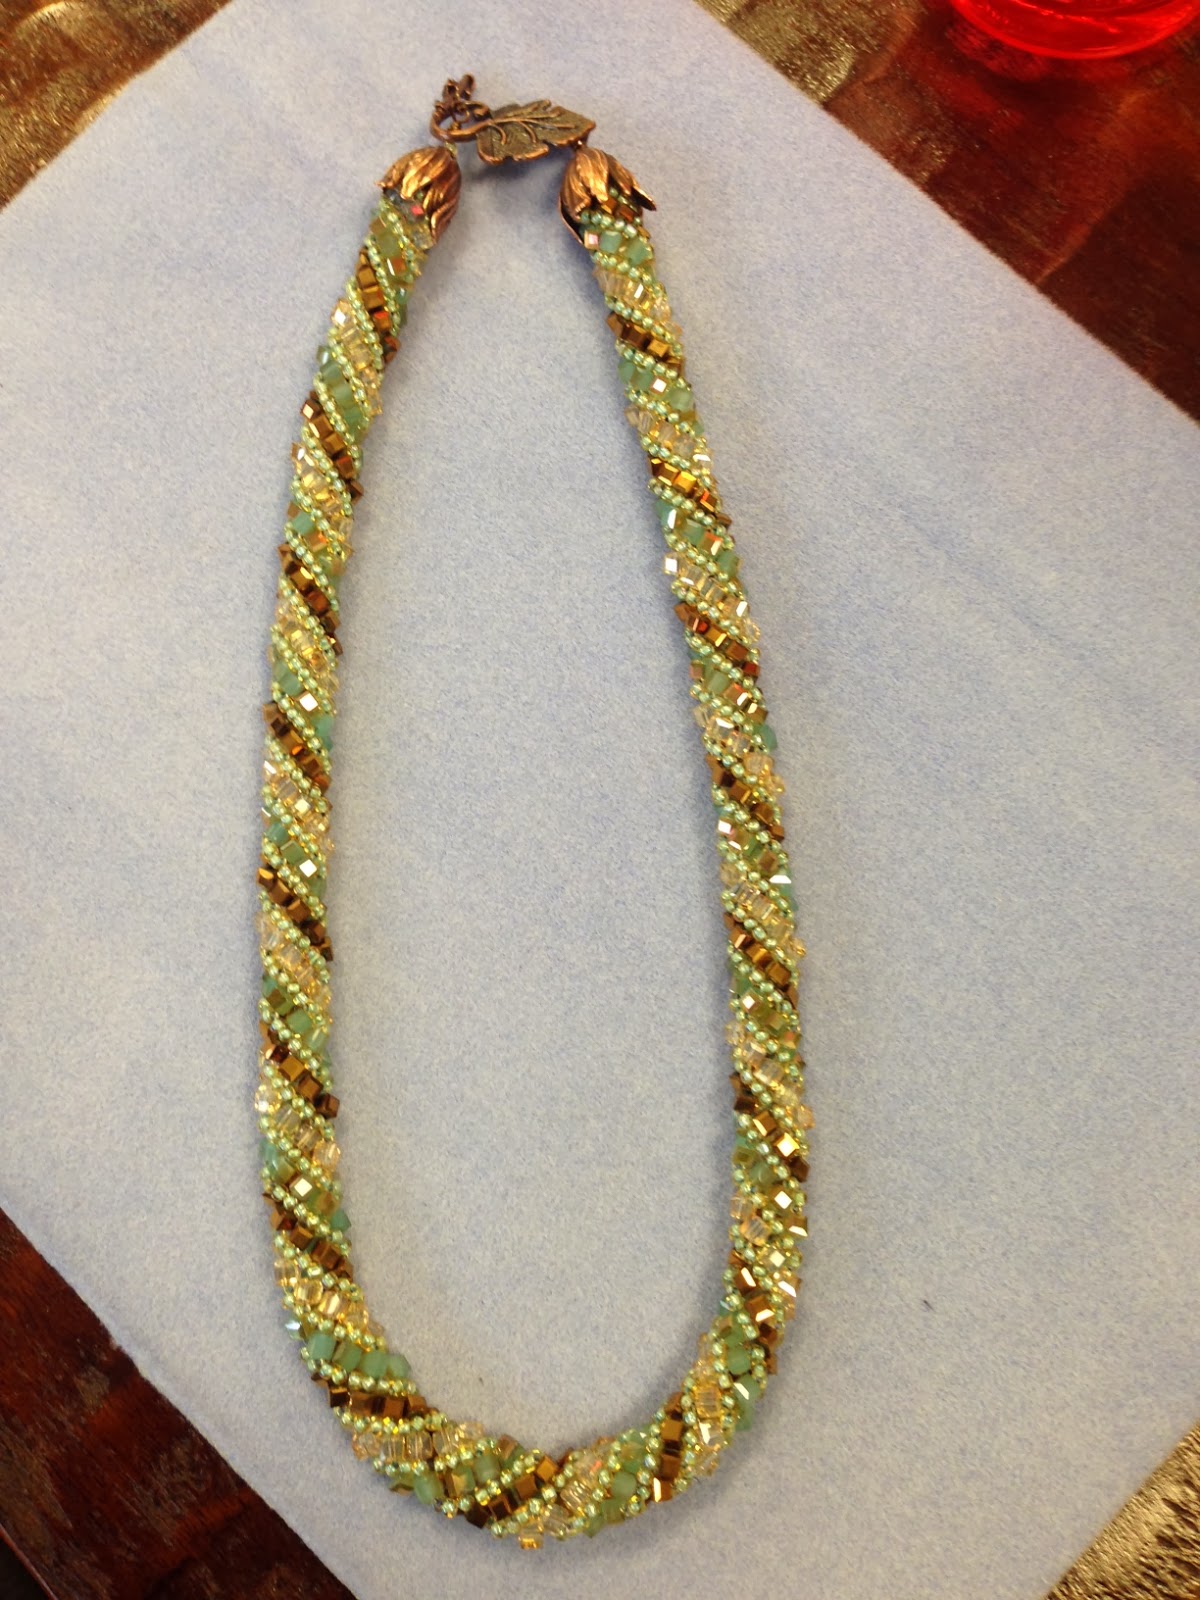
Today I wanted to share a project I made over the weekend. This is something completely different for me but it was fun to learn and now I have even more reasons to purchase beads!


This necklace was beaded by me in about 5 hours start to finish.  The pattern is called the Russian Spiral and for the style I made it requires 3 different colors of square beads and 1 color of seed beads.  It was fun and I am still amazed that I made it!

I am definitely hooked. This is something I can do while sitting with my man while he watches TV. I have a hard time sitting still for too long but I can sit still for this. Win-Win!


Here are my and my friend’s necklaces. Only one square bead and the seed bead colors are different yet they look completely different from each other. What a difference the color choice makes.

Obviously, color choice is huge! This is true in all artsy and craftsy things.  While sitting in the bead shop this weekend there was one statement I head over and over and that was: “I am terrible at picking colors”.  I heard this from about 2/3 of the people who were shopping in the store that day. Luckily the store has some fantastic people who work there and are happy to assist.

Color frightens people; however, it doesn’t have to.  There are many ways to choose colors for projects.

Color Wheel from Dick Blick Art Supply 

First off is the trusty color wheel. This is one of the color wheels that I have. If you have never used one I recommend going to an art supply store and have them give you the run down. A good color wheel will help you see how the colors work together as well as why they work together.

Another way to put colors together is to visit the Pantone website. This is a fabulous site used by designers of industries worldwide. They are the world wide leaders in the color industry and if you want to see the trending colors for the year they are the place to visit. www.pantone.com Once you visit their site you will really begin to notice the trending colors everywhere!!

Picture from All Things Shabby and Beautiful. 
Click Picture to go there

Still another great way, this is one of my favorites, is to look at color combinations that you like in magazines, on Pinterest, on websites, etc. If you see a jewelry setting, floral design, painting, room décor scheme etc. that speaks to you, look at the colors the artist/designer used. There’s your color palette. You already know you like the way the colors work together all you need to do is take that picture with you and match away with you chosen medium.  In the image above you have the stunning color combination of purple, green and brown. They work great together in nature. 

From The Little Pea Boutique
Click on photo to go to Etsy Shop

From Blume And Jensen
Click on photo to go to Etsy Shop

The images above are using some of the same colors as the picture of the bench in the garden. Hopefully you can see the potential in using pictures for color selection. I think I'll be taking all three with me next time I got to the bead shop!

I am pretty sure I’ll be learning more beading techniques since I had such a great time with this one. Beading adds so much to so many items. The faerie I am working on will have some bead work on her outfit. It makes the outfit go from cute to WOW!

Hopefully I’ll post some pictures of that soon


Have a great week

Saturday, February 8, 2014

Work in Progress

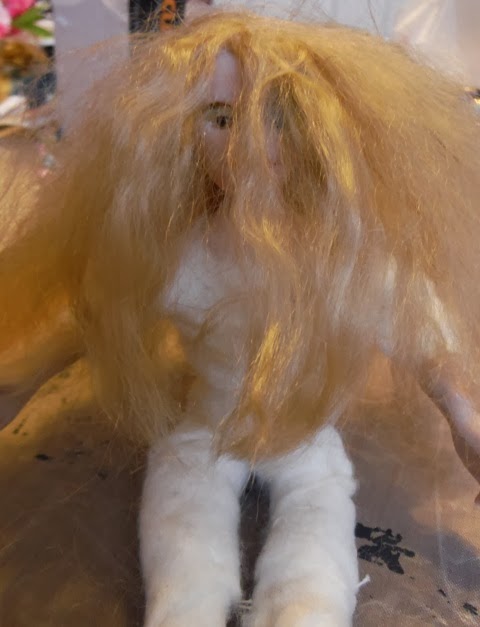
Its's been a productive weekend - finally! I've been reviewing some projects that have been neglected and thought I would show you the progress I made on one of my faerie sculptures this weekend.

Hands and Feet

Checking proportions


Fleshing out the body


Details

Hair

Waiting for clothes!

It's nice to finally make progress on a project. This little fae has been waiting a long time to be finished. This evening I'll be working on her wings and starting her costume and headpiece. She'll be getting a beaded crown of some sort. Her hair is still drying and then I can style it. Not sure what I'll be doing there but I'll post pictures once she is done.